Cheerleader
One style that comes to mind is what I call the "Cheerleader" after a video I saw of Murata's cool balancing Cheerleader robots.In this style, the robot balances on a ball, and can move the ball in different directions by moving the motors underneath it. One of the first BB-8 builders in the UK chose this approach. That makes the "ball" (BB-8's body), pretty simple, but the head is a more complicated robot.
Celebration's reveal of the stage BB-8 showed some of the problems with this approach because BB-8 can lean his head without moving the ball, so the stage droid isn't a "Cheerleader"
Hamster
Another type is what we've generally taken to calling a "Hamster" in the club. Hamster droids basically treat the body like a big hamster ball, with a robotic car hidden in the middle of the droid. This is likely the approach the stage droid took, though there are a few different ways you can build a hamster. Challenges are that the hamster has to be big enough to move the ball, and that you have to be able to open the body to service the hamster.Hamster Car
The hamster "car" could even literally be an R/C car, driving around in the ball. When the car drove, it would push the ball in that direction. That's reasonably simple, although it would mean that BB-8 would have to do 3-point turns and couldn't pivot. The stage droid showed movements in arbitrary directions, and even swiveled the body, so it probably isn't a car type hamster.Omniwheel Hamster
An omniwheel drive robot is a typically a two, three or four wheel drive vehicle where the wheels are 120 or 90 degrees to each other. Each wheel also has rollers that allow them to slide in a different direction than the wheel's rotational direction. An omniwheel robot should be able to move in any direction, and can even spin in a circle. A microcontroller sends appropriate signals to each wheel to allow for smooth movement. Here's a short video I found of one on YouTube.The Sphero BB-8 is like a two wheeled omniwheel hamster, and omniwheels are a likely candidate for the stage BB-8 we saw.
Hamster Cage
Another possibility is a frame like one of the gyroscope rides. The outer frame of the gyro would be attached to the droid shell and then motors could swivel the axis to cause the shell to move. In order for this to work, the interior car (where a person would be on a human gyroscope ride) would have to have enough weight to keep it upright. If the center bit was too light, then it'd just flip over instead of moving the ball. Since we need batteries anyway, this isn't a huge problem.A few builders are considering this approach, however it gets tricky with the frame getting in the way of other effects, like trying to control/attach the head.
A variation would be some sort of track on the interior that allowed omnidirectional movement.
The Power of Attraction
But if you do a hamster type droid, what about the head? Most builders think that the head is attached by magnets to an arm on the hamster. (This is again similar to how the Sphero works). For more complex movements, the arm could pivot to make the head lean in the direction of the movement or to peer around corners. It could also rotate.A variation of the arm would be to have a car and track mount to the hamster doing basically the same thing. A track would allow better control of the motion since you wouldn't have a 25cm arm with a large with on the end trying to be controlled by a couple motors in the middle. The track could pivot like an Artoo dome, and the magnet attachment could also rotate.
It seems likely that the stage BB-8 is some form of the magnet attraction. Challenges are balancing the magnets, the head still needs power for the lights, and the head needs to be light. Additionally the head has to slide easily on the body, which could be done with round casters.
Combination Mode
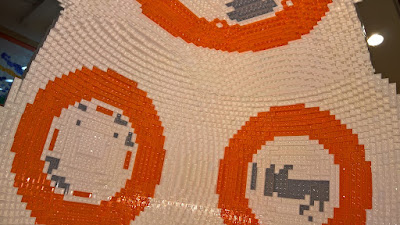
Another possibility is a combination of the two: an inner hamster and an independent cheerleader head. They'd have to coordinate their movements, which makes the system more complex in some ways, but they wouldn't have to worry about the mechanical lever arms of the magnetic method. A cheerleader head would probably still have to be lightweight (compared to the hamster) to enable leaning and peering gestures. This is probably more complex than most BB-8 builders need.What About My Lego BB-8?
The Lego BB-8 has an additional challenge that most builds don't have to worry about: Rough interior & exterior ball surfaces. Omniwheels don't like driving over rough stuff, and an irregular surface makes it hard for the head to slide, and difficult to keep an even magnetic distance.Because of the rough body, I'm leaning toward a combination hamster + cheerleader. Perhaps even a simple R/C Crawler for the hamster as big rubber tires could easily navigate the rough bricks. The trick is whether or not I can get the cheerleader to drive on the ball.
Fallback plan is a hamster with a magnetically attached head, which probably requires smoothing out at least the inner sphere. Smoothing out the sphere may help with the panel's current structural issues as we may be able to 3D print reasonably smooth plates to tie the panels together and also have a smooth interior.


